CLICK HERE TO PURCHASE IN THE E-STORE!
The next two fireplaces were installed by Joe Socco in Las Vegas, J S Interiors Gouup.
It was featured at The Jenson Group Realty on line article. The two fireplaces both had Starfire Base Glass installed.
Here is the home and fireplaces:


http://thejensongroup.com/news/how-to-choose-your-perfect-home-2/
Joseph Sacco
P: 312-404-4665
ASID, NCIDQ #023899
www.jsinteriorsgroup.com
The fireplace picture below shows what almost happened. The customer asked: Should I Paint? I think it looks good with the used marks, what do you think? I told him if he doesn't buy the paint that I would donate the paint.

He did paint and it looks great!
Now to show you a happy ending! Morris in Canada finished his fireplace any it turned out amazing!
The fireplace pictures below show a happy ending!

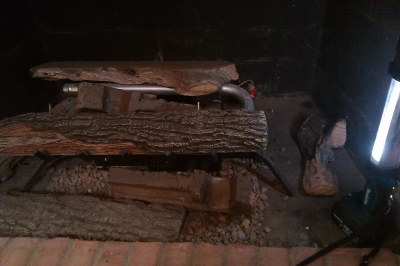
YUK, YUK, and YUK! Burning wood is like having an incinerator in your family room.


There is nothing pretty about a wood burning fireplace.
Now, paint the interior, connect the burner.

Pour in the filler.

Test your burner.

Pour in the glass and your done! Morris used a Starfire Base Glass and topped it with 3/4" Starfire Base Glass and Rhubarb Topper.


Very nice Morris! One of our Canadian Customers.

________________________________________________________________________
To see how this fireplace was transformed CLICK HERE or on the pictures below!

TO

Creativity and IMAGINATION is how.

________________________________________________________________________
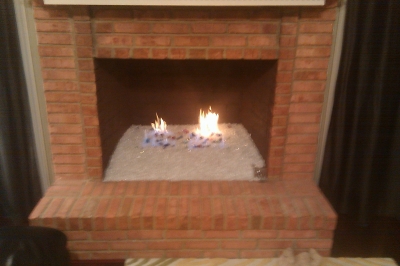
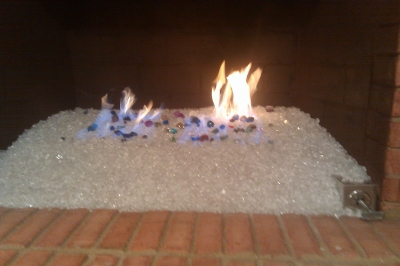
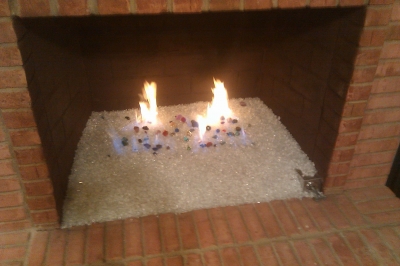
The fireplace below has a Starfire Base Glass and is topped with a bit of Pink Rosa Base Glass.


The fireplace below is a two sided fireplace from the bedroom to the bathroom. This is a very simple conversion. A Starfire Base Glass was used and topped with Gold Base Glass.


Very simple, very clean and very nice.

CLICK HERE TO PURCHASE IN THE E-STORE!
This next fireplace was done with lack of knowledge! First they installed a 18" single burner and some real interesting choices of glass. What they did do correct is have a 3" sand bed under their yuk glass. The first issue we repaired was the stub out on the left side of the fireplace floor. All we did was install a 90 degree elbow and connect a 1/2" flex line to the new double 24" burner. They had left the flex pointing in the air and then reduced it to a 3/8" line and to top that off added they very sad single 18" burner. We repainted their futile attempt (of painting) with dark metallic brown, added 10 lbs of sand and poured 75 lbs of Starfire Base Glass over the new burner and sand filler. We will explain as we move forward:


Below you can see the black marks under the paint.

Below you can see the flex line that was installed was left above the surface. Now if we tried that I think our customers would take us out and string us up, what do you think? To top it off this customer was an attorney! Completely happy with what we did.

Here is the new paint on the back walls.

Now we added the Starfire Base Glass. One thing we have been doing a little bit different is to bring the glass out from the front of the fireplace. We let the glass come out of the fireplace from 3 to 6 inches to make it look even more grand. What do you think?


Here is a the almost finished product of what we do! We left several colors with the customer to add. We will post pictures when they arrive.

CLICK HERE TO PURCHASE IN THE E-STORE!
Below are the finished pictures of what else was added:
Yellow Amber Topper,
Ice Ice Ice Topper,
Clear Diamonds,
Fuchsia Topper,
Purple Topper,
Red R Topper,
Roma Red Topper
I think it turned out very colorful! Check it out!


The fireplace pictures below show the before and after from Bob Kobus. The glass that was used is:
Let's go from start to finish:
Nice Logs! NOT!
Bob used an aluminum brick metalized panel.
Then they did their grind pattern.
And here you have it finished!
Yes the logs will be leaving very soon!
Much better, don't you think?

The fireplace pictures below will show how simple and easy it actually is to install.
Here are a few comments from J.D. Harriman John. Harriman@dlapiper.com
Subject: More proof of how easy it is to do with Moderustic providing the materials!
We are so happy with our FireGlass fireplaces (we have 3!). It has literally changed our lives in that we can use our fireplaces anytime we want with no worry about
cleaning ashes later on. Even better, the look is so superior to fake logs. All of our friends have been wowed by the look. We always send them your way.
Best regards,
J. D. Harriman
Here we go:

Above you can see how nice it WAS! YUK!
Below they painted, we always recommend painting the lines first and then painting each brick separately. Using this technique you can eliminate spots.

Install the burner. We usually recommend curling the flex line from underneath, but this works as well if your flex line is long enough. The reason for the flex line: it allows you to move the burner forward to prevent the flames from hitting the back wall.

Below the lava has been poured and test the flame pattern.

Pour the glass from the front going to the back. You can use a cup or pour from the bucket.

Turn it on and you're done!

The glass that was used is:
Starfire Base Glass,
1 lb of Gold Base Glass,
Amber Diamonds,
Ice Ice Ice Topper for one simple but nice fireplace!

The next fireplace below was designed and installed by Nadine in Texas. The colors that were installed were:
Clear Base Glass, 45 lbs
Starfire Base Glass on top, 40 lbs
3/8" Sky Blue Base Glass, 1 lb
New Yellow Base Glass, 1 lb
Blue 2000 Base Glass, 1 lb
Red Orange 1122 Topping, 1/4 lb
Emerald Green Topping 1417, 1/2 lb
Neo Lavender Topping 1842, 1/4 lb
Aqua Blue Topping 1808, 1 lb
Deep Royal Topping 1114, 1 lb
Salmon Pink Topping 0305, 1 lb
Erbium Pink Topping 1821, 1/4 lb
Pink Topping 1215, 1/2 lb
Pumpkin Orange Topping 3 lbs
Lipstick Topping, 1 1/2 lb
and Gold Base Glass around the outer edge, 23 lbs.


______________________________________________________________________
Click HERE or on the picture to see how it was transformed to this!

From THIS! (BELOW) again YUK!

______________________________________________________________________
The fireplace below belongs to Deborah Hawkins and she installed a bed of crushed lava and topped it with with Black Base Glass, a few lbs of Starfire Base Glass and about 1 lb of Copper Ruby Red Topper.


The customer wanted a
Copper Blue Topper and we sent pictures of different base glass options,
all with
Copper Blue Topper on top. Each looks very different. We can and will do the same for you, send you pictures of your combinations if you like.


The next fireplace was installed by Ken Kenoyer. He constructed his own pan for his
Direct Vent Fireplace conversion with our supervision. We will go through the steps to complete his installation. The glass that was used was
Starfire Base Glass and topped with
Red Topping and
Red Topper. We will explain as we move forward.

Above is your fireplace now (if you like logs).
Below is your burner system that came with your wonderful Direct Vent Fireplace and logs.

Below is a pictures of your pilot light system

Below we have removed the "stuff" and exposed the pilot and gas connection.

Royce built a pan to fit the fireplace.

Below he cut the pan out to accept the pilot light.

Connected the gas line.

Tested the burner.

Pour the glass and your done! If anyone has told you that you can't convert a direct vent fireplace then these pictures and project don't exist! Just because they don't know what or how to do it, doesn't mean it can't be done.

The glass face is back on and it looks much better. A very nice and simple Self Installation!

The fireplace below was a
Self Installation by Julie and Ty Hergenrother. This is a typical
Direct Vent conversion that we help hundreds if not thousands of customers convert from those nasty logs. The glass that was installed was a base of
Starfire Base Glass and topped with
Bronze Base Glass and
Gold Base Glass.

These all start out nasty and we do what we can to change that, one fireplace at a time.


We even made the bottom face shield to make it look more uniform. This can also be done in any metal or design.

The fire pit below is a propane fire pit. Notice that there is no soot! If you do it right, then it is done right! We are very proud of this fact. The base glass is a Starfire Base Glass Topped with a Copper Blue Topper.

On the picture below you can see the Propane pilot cover/ blow out box at the bottom of the picture. When I received these pictures I didn't understand the dark chunks???? The customer was being creative and dropped in a few chunks of lava.


This particular Topper is a Copper Blue Topper, meaning we use copper and chrome to manufacture the glass. What this means is that when the glass gets hot, it turns green (because of the copper) and when it cools it returns to blue (because of the chrome). We actually have almost 30 colors which change colors. We hope to introduce these chameleons in the near future. But for now they are just hiding amongst the other colors.

CLICK HERE TO PURCHASE IN THE E-STORE!
The next pictures are of a Bull Dog cut from 1/2" aluminum. Water Jet.


The next two pictures show the whiskers and eye brows inserted.


Below, Teena sent us finished pictures of the Bull Dog LOGO!

The glass that is used in the fire pit;
White Sand = Teeth and eyes,
Red Topping = Collar,
Amber Base Glass = Main body,
Starfire Base Glass = Studs on collar,
Evergreen Base Glass and Evergreen Reflective Base Glass = All around

The next fireplace of Barbara Duffy has an 1/8" Clear Base Glass under the Starfire Base Glass Topped With Purple Topper.

And of course how it looked when they started. YUK!
When burning, the
Diamonds have a convex bottom which make it appear that it is melting on the inside.
Nadine is very creative and always tries to add her personal touches.

The next fireplace was installed by Brian Cooper. The glass that he installed is:
Starfire Base Glass,
Bronze Reflective Base Glass
and
Emerald Green Topper.

Nice, huh?

2" method, sand base for lighter colored glass.


This next set of pictures of a fire and water feature is now in Nebraska with Brian Johnson.
We will explain as we go:
The water spins in the lower bowl spilling over giving you white noise.

The lights on the inner edger can be LED or Incandescent, which ever you prefer.


A 12" center-less stainless steel ring is used


The glass we used for testing is Starfire

The bottom holding tank can be as close or as far as you like. The hoses which return the water to the lower tank can also be above the water line creating a trickling water noise. This can be adjusted to your desire.


Now with fire!

You can see the holding tank 24" below and the water is dripping into the tank.


We cut a pattern of a top to conceal the edge light. That is the border you are seeing.


CLICK HERE TO PURCHASE IN THE E-STORE!
The next fireplace was installed by Jim Esposito in Palm Springs California. There used a larger variety of color and it shows wonderfully!
The installed:
1 pound each of

The next
"B" vent or Direct Vent fireplace is from Mark Basillus, Showing how easy it actually is. Again for all of those "Dummies" out there that keep telling you that you can't do it. Also keep telling you "the sky is falling!" I had to say that!
Oh look! Nice logs! NOT!
Here is what Mark had to say:
Ed,
Wanted to share with you the photos of our finished conversion to FireGlass.
We are really pleased that we decided to paint the inside of the fire box
red. That coupled with the glass had made the fireplace a focal point to
our living area!
Mark Basilius
[mailto:MBasilius@evgvikings.org]We sent the colors below to a customer who wanted to see several options. Here they are:
We laid this out on a 16" x 32 area to show the customer how much 5 lbs of
E.D. Diamonds actually was.
Here are two different color combinations we were asked to send to a customer. We include flash from the camera and no flash to show the variation of color. The first picture of each set has flash and the second has no flash.
Here we go:


The next fireplace is a self installation by Harminder in West Covina, Californa. He installed
Starfire Base Glass after he installed the 3
Sterling Silver back panels.
The only mistake that was made is that the glass should of been higher to cover the gas line coming in on the right side. He should of added more of a sand base, brought the sand and glass out of the fireplace for a more refined look. That is unless you like pipes!
CLICK HERE TO PURCHASE IN THE E-STORE!
Texas Long Horn Fire Pit LOGO!
Ed, Morgan and crew at Moderustic:
Finally completed my project for the Texas Longhorn Alum in my RV Park. Actual time was only approx 80 hours but did not work on it full time.
Had my local welding fabricator build the base out of ¼” square tube for the circles and 1” square tube for the legs and attached some decorative feet on it. Also attached some L brackets at the top to install the granite top with.
Fabricator also built a 28” diameter by 4” deep pan out of 16ga steel. Later we decided to add a ¾” lip around the top edge.
We drilled holes in it to install some retractable handles for easier installation / maintenance. Drilled holes for the pilot assemble to pass through the pan and for the burner assembly to attach.
We had another 28.5” diameter 16ga steel circle cut out to create a lid for the pan to prevent rain/debris from disturbing the Glassel bed.
Used the longhorn cookie cutter cut out to make a 16ga steel flat longhorn cutout to affix atop of the lid
Had the pan and lid sandblasted and powder coated black to match the base. Had the longhorn powder coated candy copper along with a handle to match.
Cutout a ¾” plywood base to use to attach the granite to. Installed Tee Nuts into the plywood so that we could screw the plywood base onto the base of the table later.
Purchased and installed some 110v LED low profile puck lights and affixed to the underside of the plywood to create indirect lighting of the table, routed channels for the cabling to follow and used silicone to keep in place
Had my local granite company cut a ¾” thick 52” diameter circle with a 28” opening in the center to accommodate the pan.
Attached the granite to the plywood base using silicone.
Installed Cement Board onto the inside of the table base as a bed for the stone tiles.
Installed the Lowes Special Order Solistone 12” x 12” Stone Tiles around the table.
Created a bracket inside the table base to hang the AFVK-SP-MH/L and extended the wiring on the battery box to allow for installation underneath the granite top outside the table base to be able to change batteries later.
All the parts are complete so time for the final install
1. Place base in location, propane line already in place as well as 110v electric with X10 remote socket for LED lights.
2. Install plywood / granite / LED lights onto table base and screw into Tee Nuts
3. Install Pan on top of granite leaving access into the table to complete connections.
a. Disconnect Pilot assembly from AF-4000 MOD and run gas line, ignitor and sensor through hole in pan inside the table
b. Reconnect Pilot assembly back to AF-4000 MOD ( Be sure to use the correct connections or things will not work J )
c. Attach the battery pack to the underside of the granite base in the routed channel to allow the wiring to move in / out for ease of use.
d. Attach the pilot tube to the AFVK-SP-MH/L module.
e. Install the burner inside the pan and attach the Gas Outlet connection to the burner.
f. Attach the Gas Inlet connection to the gas supply line which has a cutoff on it.
g. Test the remote lighting and check all fittings with soapy water for leaks.
4. Once everything checked out, install the pan inside the opening.
5. Install a layer of lava rock under the double burner to lift if from the bottom about 1”
6. Install ¼” Starfire Glassel on top of lava and covering the burner while leaving the pilot assembly exposed to be able to function.
7. Tested the remote again to verify operation
8. Install the Longhorn cookie cutter and fill with Pimento Red Topping Glassel.
9. Install cover
Bruce Figura bfigura@swbell.net
and now for the construction and pictures...


The next pan is a stainless steel pan we manufactures for our customer in Hawaii. The system that was install was a
ventless burner to burn
propane with our glass. We will explain as we go forward.
On the front of the pan we we bend an open back hemmed stainless steel curtain to conceal the controls but it is still easy access.
This is the ODS (Oxygen Depletion Sensor) it speaks for its self.
Here we are burning propane with a
Starfire Base Glass, please note what a clean burn! We do it right.
All of our pans are built for each application and fireplace.
The next fire pit was built for Chuck Krallman in the Bahamas. The challenge was 15 knots per hour trade winds and
propane. Not a problem. We mock up all of our projects to insure that they work properly. I will explain as we move on.
We first start testing the venting and use cardboard or plywood only later to be replaces with 1/2" glass panels.
Proper venting and maintaining an upward draft is very important.
Hopefully Chuck will send us the finished and installed pictures of the feature installed in his table.
and topped it with 2 lbs of
Mixed Toppers.
There is about 4" of sand underneath.
CLICK HERE TO PURCHASE IN THE E-STORE!
The next fireplace was installed by Tracey Watson. She used a Starfire Base Glass, added Gold Base Glass, Ice Ice Ice Topper and topped it with 4" Black Terra Cotta Fire Balls. Now for the bad part: Always test your burner to insure your flames are in the center and I recommend removing the screens. When you remove the screens, you may want to paint the interior, just a thought!


CLICK HERE TO PURCHASE IN THE E-STORE!